Battle of Abu Klea
| Battle of Abu Klea | |||||||
|---|---|---|---|---|---|---|---|
| Part of Mahdist War | |||||||
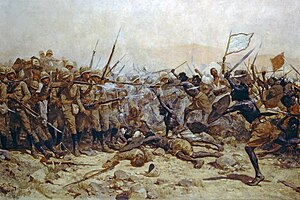
 The Battle of Abu Klea by William Barnes Wollen |
|||||||
|
|||||||
| Belligerents | |||||||
|
|
|
||||||
| Commanders and leaders | |||||||
|
MG Sir Herbert Stewart † BG Sir Charles W. Wilson |
Mohammed Ahmed "The Madhi" | ||||||
| Strength | |||||||
| ~1,400 | ~13,000 | ||||||
| Casualties and losses | |||||||
| 76 killed 82 wounded |
1,100 killed, unknown wounded | ||||||
The Battle of Abu Klea, or the Battle of Abu Tulayh, took place between the dates of 16 and 18 January 1885, at Abu Klea, Sudan, between the British Desert Column and Mahdist forces encamped near Abu Klea. The Desert Column, a force of approximately 1,400 soldiers, started from Korti, Sudan on 30 December 1884; the Desert Column's mission, in a joint effort titled "The Gordon Relief Expedition", was to march across the desert to the aid of General Charles George Gordon at Khartoum, Sudan, who was besieged there by Mahdist forces.
The place is generally known in British military records as Abu Klea, which arose as a contemporary British spelling of its Arabic name, 'Abu Tͅuleiħ (أَبُو طُلَيْح).
The British forces consisted of the 1,100 British of the Desert Column under Sir Herbert Stewart, against a Sudanese force of approximately 12,000 fighters. While the main British force (the River Column), led by General Sir Garnet Wolseley travelled by river from Korti to Khartoum, Stewart's column was to cut across country by column directly for Khartoum, since time was running short according to what little information was available from the garrison. The force was composed of four regiments of camel-mounted troops (Guards, Heavy, Light and Mounted Infantry), detachments of the various infantry regiments in Egypt and of the River Column, and a detachment of the 19th Hussars, mounted on horses. Four light field pieces and a small Naval Brigade manning a Gardner machine gun completed the force.
The Desert Column arrived on the salient overlooking the wadi of Abu Klea not long before sunset, and Stewart decided not to attack that night. The British built a defensive position (or zariba), but were sniped at from the high ground around them by Mahdist rifle-units - mainly slave-soldiers from southern Sudan - all night. They took several casualties. At first light Stewart ordered them to form a square, which they achieved with perfect discipline, though still under fire from enemy snipers. The square moved slowly towards the wells along the side of the wadi, over very difficult, undulating, rocky ground. Suddenly the square was ambushed by a huge Mahdist force that had been concealing itself in the wadi. The British guns were on the leading face of the square, and the Naval Brigade, with their Gardner machine gun, at the rear left hand corner, nearest the wadi. Several officers and men of HMS Alexandra were killed at the battle. As the British halted to repel the Mahdist force, a gap opened up towards the rear left corner of the square. This was caused when Captain Lord Charles Beresford RN, commanding the Naval Brigade, ordered the Gardner gun to be run out on the left flank of the infantry square to provide covering fire. Colonel Frederick Gustavus Burnaby then gave an impromptu order for the Heavy Camel Regiment to wheel out of the square in support of the Gardner gun. The gun had been tested and found very reliable in Britain, but had not been tested in a desert with loose sand getting into its mechanism. It fired seventy rounds and then jammed, and as the crew tried to clear it they were cut down in a rush by the Dervishes. Out of the forty men in the Naval contingent, Lieutenants Alfred Piggott and Rudolph de Lisle were killed along with Chief Boatswain's Mate Bill Rhodes and five other seamen and seven more were wounded. Lord Beresford was 'scratched' on the left hand by a spear as he managed to duck under the gun. The weight of the rush pushed the sailors back into the face of the square. Several Dervishes got inside the square, but found the interior full of camels and could not proceed. The troops in the rear ranks faced about and opened fire into the press of men and camels behind them, and were able to drive the Dervishes out of the square and compel them to retreat from the field.
...
Wikipedia
